
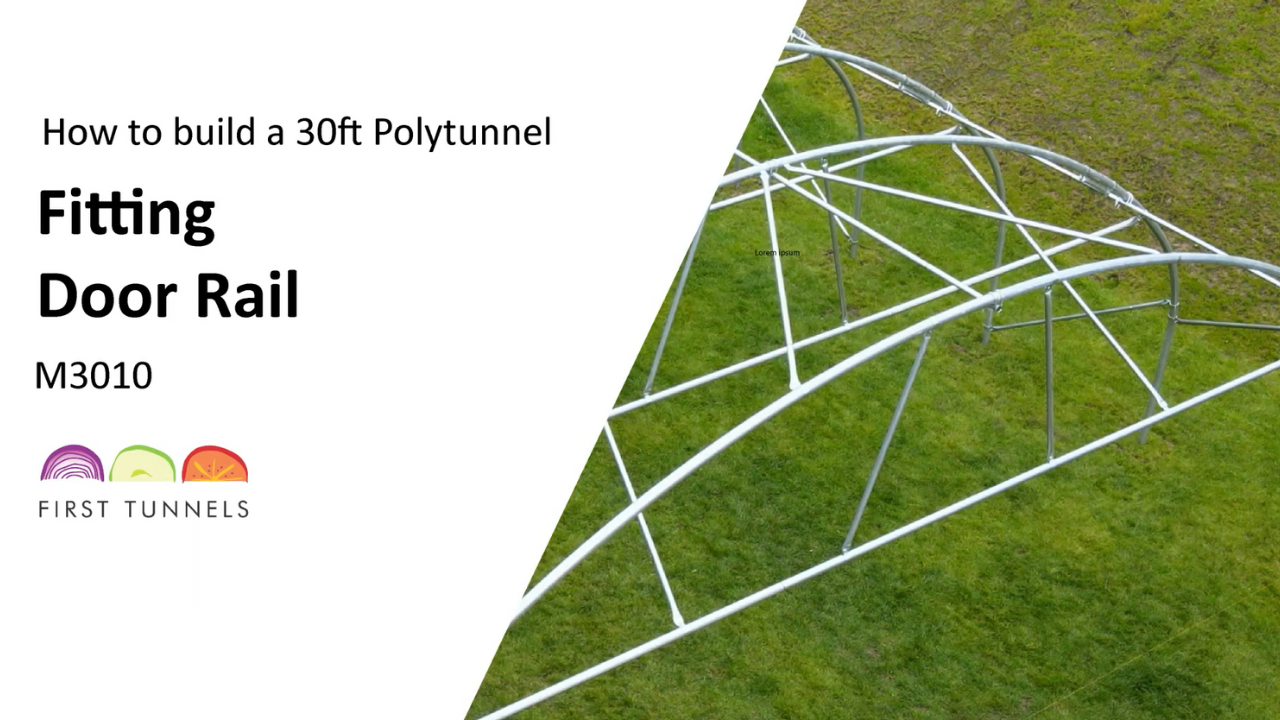


Door rails span across the width of your polytunnel on the end hoops (fig 10a). Door rails are supplied in 3 pieces, two are 2.59m long and are flattened at one end and swaged on the other (50/259FS). The third piece is 2.4m long and is plain at both ends (50/248PP). Connect the tubes together by locating the swaged ends in the plain ends. Secure the three pieces together with self-drilling screws (SDS55) 4cm from the joint, ensuring that both flattened ends are inline.
Fit a Q clip (Q60) to the hoop above the corner stabiliser. Locate one end of the door rail to the Q clip, push a bolt through the hole ensuring the thread is on the inside of the polytunnel and loosely secure in place. Position another Q clip on the other side of the hoop, locate the flat end of the door rail to the Q clip and push a bolt through the hole and loosely secure in place. You need ensure that the door rail is level. Place a spirit level on the door rail and adjust accordingly. Tighten the bolts on the Q clips on both sides (fig 10b).
Door rail vertical braces span from the door rail to the end hoop (fig 10c). There are 2 door rail vertical braces per end. Door rail vertical braces are 1.4m long and are flat at both ends (35/140FF). From the ridge clamp measure 40cm along the hoop and fit a Q clip (Q60). Locate the flat end of vertical brace to the Q clip, push a bolt through the hole and firmly tighten. Repeat on the opposite side. Now fit a Q clip (Q50) to the door rail. Locate the flat end of the vertical brace to this Q clip, push a bolt through the hole and loosely secure in place. You may need to lift the door rail up to do this. Repeat this on the other side. Ensure that the door rail vertical braces are not pushing the door rail down nor pulling it up. Once you are happy with the level, tighten both Q clips.
Door rail stabilisers span from the door rail to the first intermediate hoop (fig 10d). There are 2 door rail stabilisers per end. They are supplied in 2 pieces. One is 1.78m long and is flat at one end and plain at the opposite end (35/178FP). The second is 45cm long, flat at one end and swaged at the opposite end (35/45FS). From the end of the door rail measure 1.83m in and make a mark. Fit a Q clip (Q50) at this point. They are positioned there so they don’t interfere with the door post timbers. Now fit a Q clip (Q60) on the first intermediate hoop approximately 2 meters from the ridge clamp. Locate the flat end of the 1.78m piece to the Q clip on the intermediate hoop, push a bolt through the hole and loosely secure in place. Slide the swaged end of the 45cm piece into the plain end of the 1.78m piece, we will secure this tube to the door rail first. Loosely secure the flat end to the Q clip (Q50) on the door rail. Whilst ensuring these two pieces do not separate, adjust the Q clip on the intermediate hoop. Secure the two pieces together with a self-drilling screw (SDS55) 4cm from the joint. Repeat for the door rail stabiliser on the opposite side. Ensure the Q clips on the door rail are on the 1.83m mark and firmly tighten. Then adjust the Q clips on the intermediate hoop so the door rail doesn’t bow in or out of the polytunnel (fig 10e). When you are happy with the position firmly tighten the nuts. You can now repeat this process on the opposite end of the polytunnel.
Click to enlarge

10a

10b

10c

10d

10e